Products
Solutions
Resources
9977 N 90th Street, Suite 250 Scottsdale, AZ 85258 | 1-800-637-7496
© 2024 InEight, Inc. All Rights Reserved | Privacy Statement | Terms of Service | Cookie Policy | Do not sell/share my information

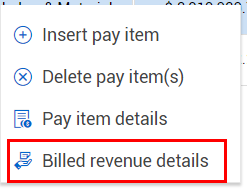
On the Pay Items screen, selecting Billed revenue details from the context menu opens the Billed revenue slide out panel.
The Billed revenue slide out panel is where you can record what you bill to the client.
The Billed Revenue Details window defaults to the Billed tab. This is where you enter in information about what you want to bill to your customer and also view pending billable quantity and pending billable revenue based on the progress of the cost items associated and their earnings rules.
After selecting apply, the billed amount is visible on the Pay Register screen under the five Billed columns:
Is billed - If checked, a billing record has been created
Billed quantity - This is based on your pay quantity, and depends your UOM, and how you want to bill the quantity
Billed revenue - What you billed to the client
Pending billable quantity = Earned quantity - Billed quantity to date
Pending billable revenue = Earned revenue - Billed revenue to date
When you bill revenue or quantity for unit price pay items, the billed quantity or revenue automatically adjusts proportionally to the entered billed value to match the unit price.
For example, if the current unit price is $1,000.00 and the billed quantity is 0.50, then the billed revenue automatically calculates at $500.00.
Once a pay item is billed, you can no longer delete the pay item.
Once you have billed revenue and quantity to your customer, all columns will populate with values.
As soon as work is progressed on the cost item(s) associated to a pay item, the quantity earned, revenue earned, pending billable quantity, and pending billable revenue fields will populate with values. When a bill is processed, the billed quantity and billed revenue fields will update, and the pending billable quantity and pending billable revenue fields will also update (subtract out the new billed amounts). The quantity earned and revenue earned columns are not affected by billing.
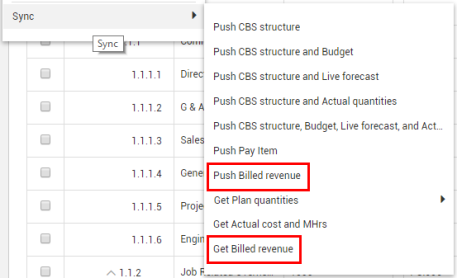
As a result of the Push or Get Billed revenue actions, this will update each respective pay item.

You can also view a record of the newly created bill in Billed History by navigating back to Billed Revenue Details screen.
The billing-related fields that are now part of the Pay Items register are the Billed Revenue, Billed Quantity, Quantity earned, Revenue earned, Pending billable quantity, and Pending billable revenue columns. Once you have billed revenue and quantity to your customer, all columns will populate with values. The pending amount fields are driven from the Quantity earned and Revenue earned amounts. Furthermore, the pending amount fields help you identify what has been billed versus what is left to be billed based on what has been completed for your cost items.
The Is billed checkbox also populates when a pay item has been billed.
Within the Pay item register you have a date filtering option available for the pay items that can be applied to columns based on the billed date. To get back to the to date calendar, click on the calendar icon and select To date from the drop-down.

When creating a bill in the slide-out panel, or from the bill multiple pay items option, you can select a change order to assign the billed amount to.
Associate a change order to a pay item by selecting a change order either from the Billed revenue details, or Bill multiple pay items options. This lets you select which approved change orders to assign to the bill.
After submitting the bill in the Billed History tab, the associated change order becomes associated with the bill.
The Total Change Order Amount column shows how much of a pay item’s price is from change orders. This is a summary of all the approved change orders that are attributed to a pay item. The Billed Change Order Amount shows how much money has been billed to the customer against a change order.
The following Step by Step walks you through how to bill a customer for revenue earned.
On the Pay Items tab, select the a pay item.
Hover over to the right of the Description and click on the three black dots.
Select Billed revenue details.

Under the Billed tab, enter the following:
Billed revenue = $100.00.
Cost category = Installed Materials
Billed quantity = 1
Billed date = today’s date
Cost item = [insert a cost item from the dropdown menu]
Notes = ‘billing $100.00 for materials needed for concrete prep work, performed on 08/02/2019’
Select Apply.
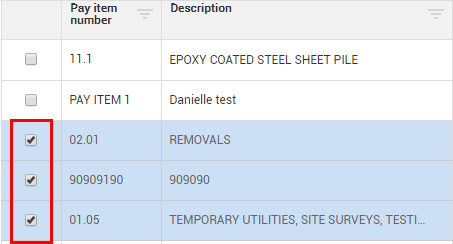
Billings often include multiple pay items. For that reason Control also allows users to claim billed quantities and revenue for multiple pay items at a time using the pay item grid view. This is in lieu of using the Billed Revenue Details slideout panel, per pay item. On the Pay Items screen, select those desired pay items you wish to bill.
In the example below for Pay Item 11.1, the Revenue Earned represents the amount that has been earned to date. Revenue earned is based on the cost items associated to this pay item. As cost items are being claimed, Revenue earned is generated. For Pay Item 11.1, under Revenue earned, $365,924.12 has been earned to date. Billed revenue is showing that $20,966.00 has been billed thus far. The difference between the Revenue earned and the Billed revenue, is the Pending billable revenue which is $344,958.12. This is the amount that you can bill to the customer.
Typically, when it's time to bill, you can select the pay items with positive values in the Pending billable revenue column.
A negative value in the Pending billable quantity and/or Pending billable revenue fields signifies an over billing to the customer.
When it's time to bill a customer, select the desired pay items to mark for billing, right click, then select the Bill multiple pay items option.
The New Bill Request screen appears, which displays billing related fields to potentially be billed to the customer. The Pending billable quantity and Pending billable revenue fields are at zero because their values have been moved to the Billed Revenue and Billed quantity fields, to be billed as part of the overall transaction. The Billed revenue and Billed quantity values in the New bill request window will match the Pending billable revenue and Pending billable quantity values in the Pay items tab.
In the New Bill Request example below, the values in the Billed quantity and Billed revenue fields are the amounts that are to be billed to the customer. The Billed Revenue and Billed Quantity columns show the same amounts that exist in the Pay Item screen under the Pending billable quantity and Pending billable revenue columns.
You also have the option to change the Billed Revenue amount in the New Bill Request screen. For example, if there's remaining work still to be done, and it's not 100% complete, you can change the Billed revenue to a different amount. Using the example below for Pay item 11.1, you have the option to partially bill the Pending billed revenue of $344,958.12. By changing the Billed revenue amount to $300,000.00, the remaining $44,958.00 displays under the Pending billable revenue column.
Now, you can see that if you bill for $300,000.00, then you still have $44,958.00 available to bill.
It's possible to assign the bill request to a Cost category and a Cost item. Each billed revenue transaction requires a cost category to be selected. The default value is Undefined.
Enter and save any information specific to the bill request in the Notes field.
When you select the Submit button in the New Bill Request screen, the billed transaction appears in the Billed History tab in the Billed Revenue Details slideout tab.
This action also creates new audit log entries in the Pay Item's audit log, that show the pay item that was changed, along with fields that display the before and after values, and the user that made the change.
Updates are made to the following Pay Item fields: Billed revenue, Billed quantity, Pending billable revenue, and Pending billable quantity. If the Billing method is Cost Plus, then the Forecast final revenue and forecast unit revenue fields will also be updated.
The following Step by Step walks you through how to bill for multiple pay items.

The Billed Revenue in the New Bill Request screen should match the Pending billable revenue in the Pay Item screen
In Pay Items, after a bill has been sent to a client, you can log revenue that has been received and log and track received revenue.
In the Pay Items register, when you select the Claim Revenue icon, it shows all transactions for all pay items that contain billed revenue that has not been logged as received.
Alternatively, you can right-click on one or more pay items and select Actual revenue details.
The Actual revenue details form opens, which shows all the selected pay item billed transactions. In the Revenue received column, you can enter the amount of money received by a client. The Revenue received date lets you enter the date the money is received.
You can select all or some of the billed transactions, and then click the Auto Calculate icon to match the total revenue received values with the billed revenue values (everything that has been billed has been received in total).
The revenue is also updated on the Billed History tab in Billed Revenue Details, for a pay item.
After the Actual revenue details form is submitted, the Revenue received (to date) column on the Pay Items form shows the pay item amount received.
Additional Information
9977 N 90th Street, Suite 250 Scottsdale, AZ 85258 | 1-800-637-7496
© 2024 InEight, Inc. All Rights Reserved | Privacy Statement | Terms of Service | Cookie Policy | Do not sell/share my information
